Kinusaiga, taught by award-winning fiber artist Hannah Austin

It Looks Like a Painting. It's Actually Fabric.

Kinusaiga (kee-noo-SYE-gah) is a Japanese fabric art with no sewing, no drawing, and no paint. Learn it in one afternoon and finish with a framed 9" x 9" landscape ready to hang on your wall.

(Even if you've never considered yourself an artist)

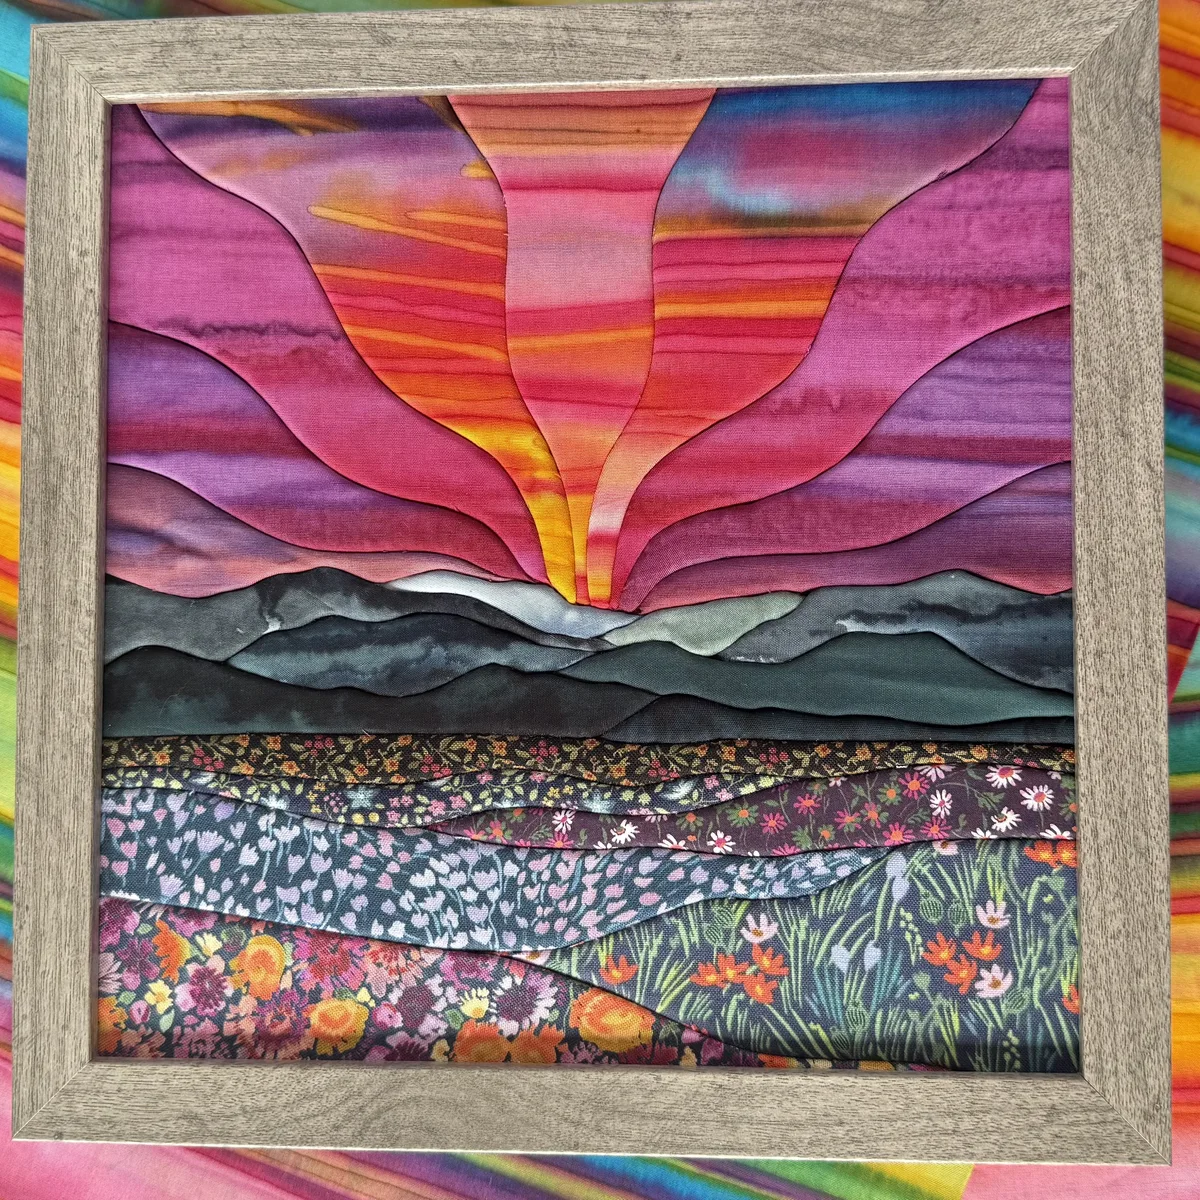
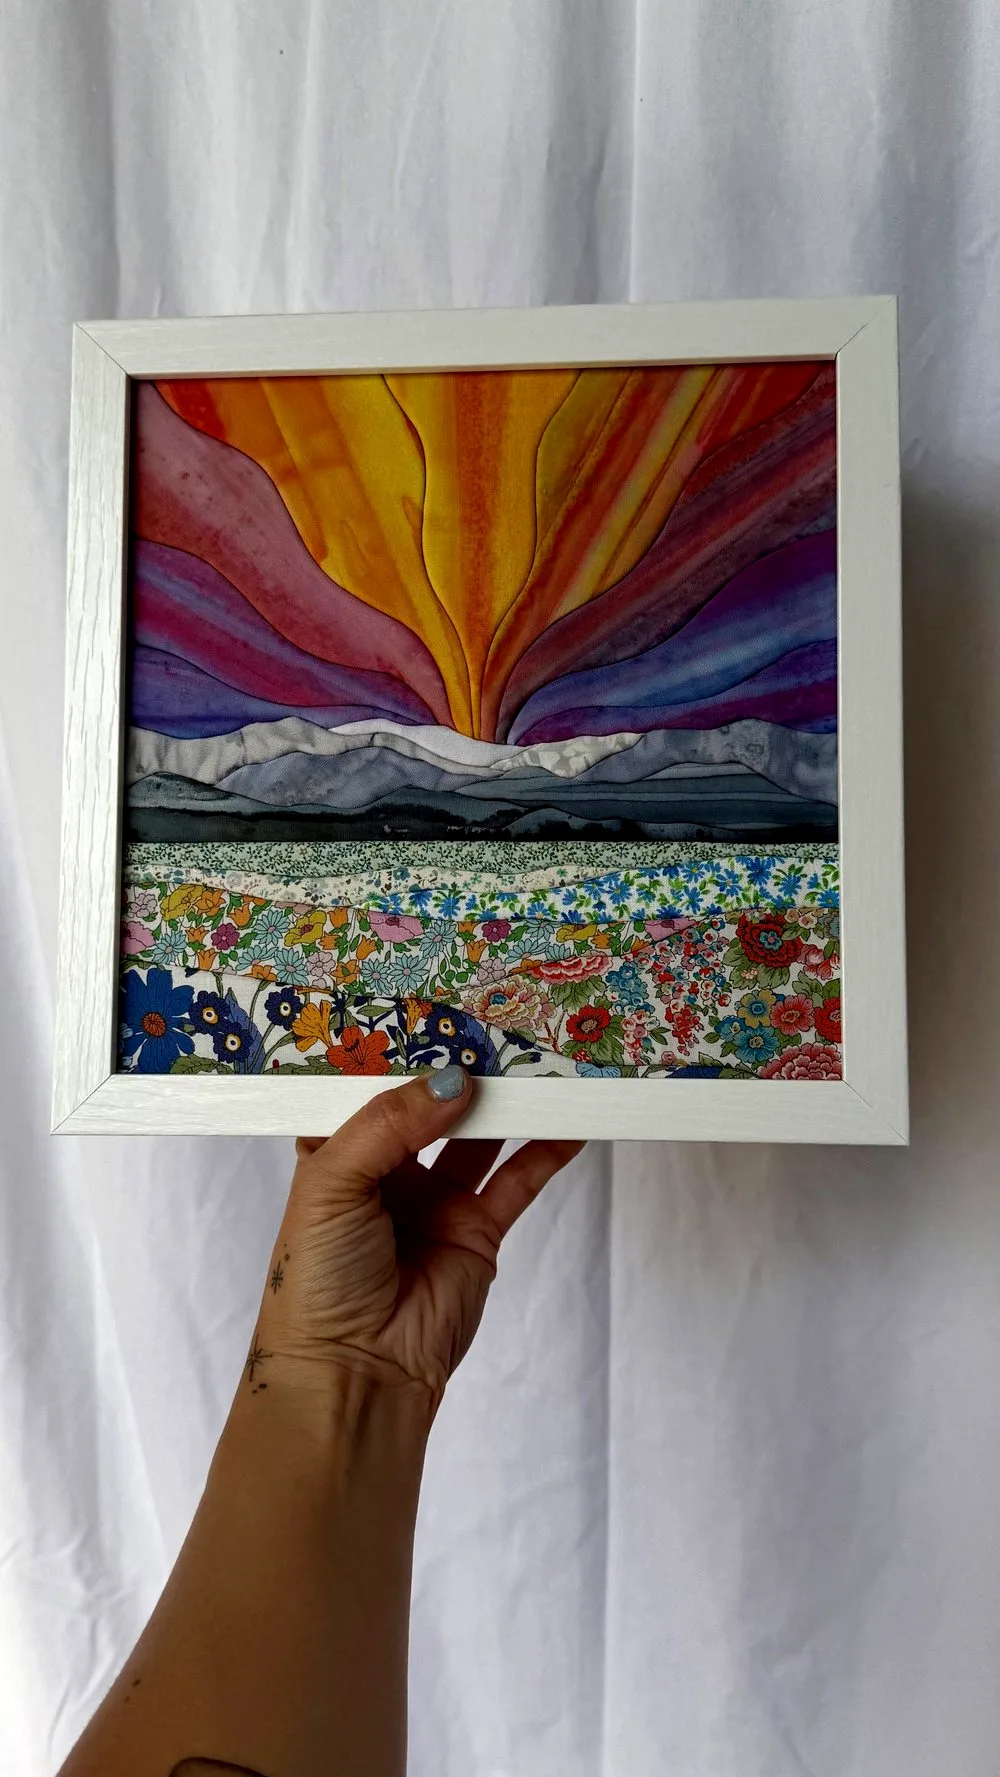
A finished kinusaiga fabric landscape in a wooden frame: a pink and orange sunrise over layered mountains above a wildflower meadow, all made from tucked fabric
200,000 makers follow Hannah's fabric art on Instagram

A Japanese Art Most People Have Never Heard Of

From across the room it reads as a painting. The sky has a gradient. The mountains recede into haze. The meadow looks like it runs back a mile.

Walk up to it and the surface is quilted. Every color in the picture is a piece of cloth.
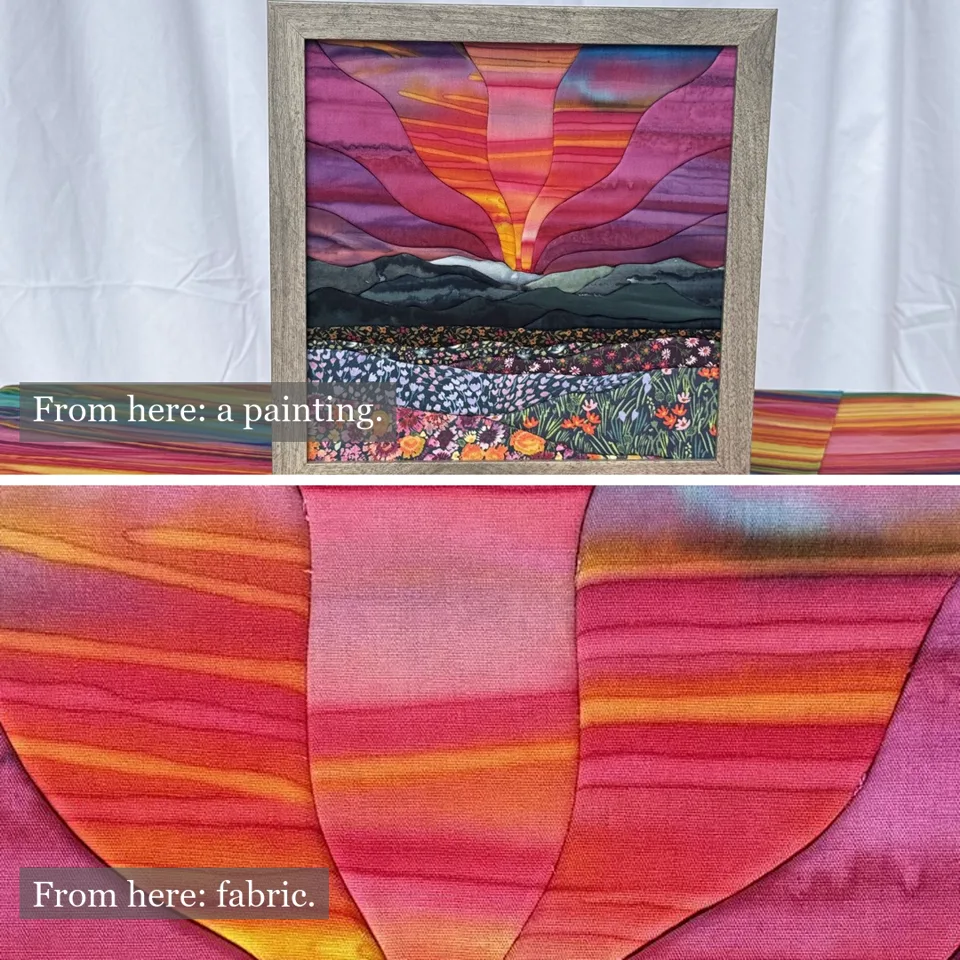
Two views of the same kinusaiga piece: from across the room it reads as a painting, up close it is fabric tucked into a board

That is kinusaiga. Japanese artist Setsu Maeno created it in the 1980s, building on the centuries-old kimekomi tradition of tucking fabric into carved grooves. Hannah credits Maeno in the very first video of the course, and what she teaches is the process she has worked out over her own years of practice.

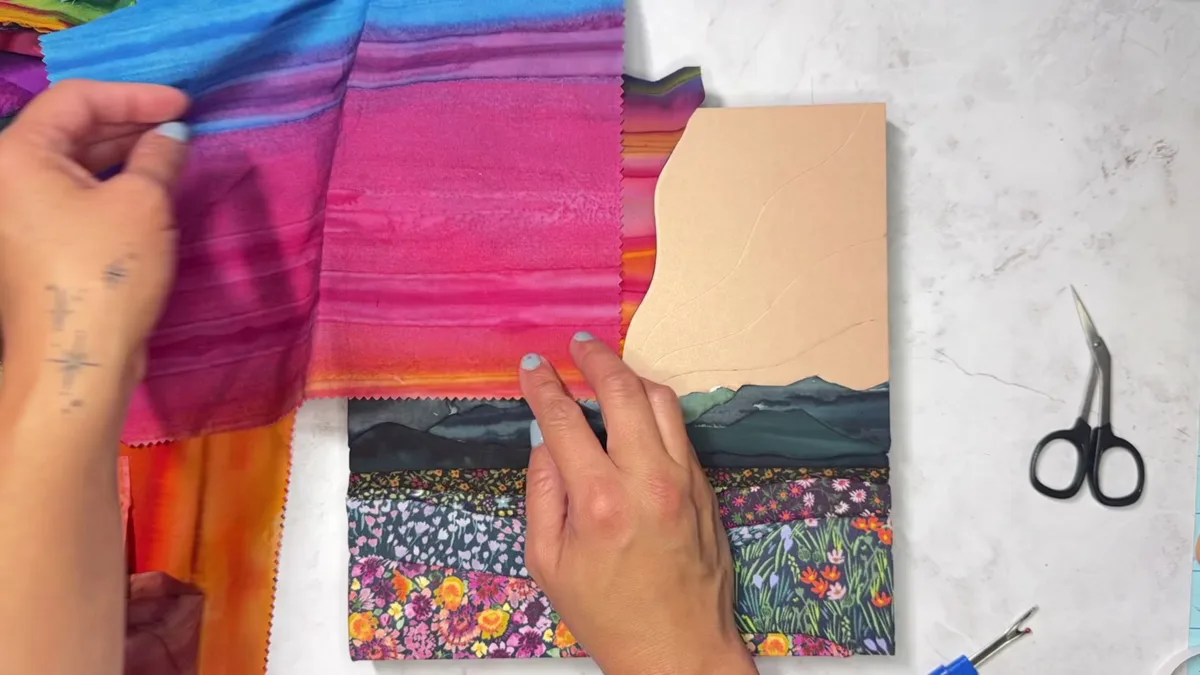
Nothing is drawn and nothing is painted. You carve shallow grooves into a foam board, following a printed template. You lay a piece of fabric over each section and press the raw edges down into the grooves with the back of a seam ripper. The edge vanishes. The fabric pillows up like a tiny quilt. Section by section, the picture appears.

The painted look comes from the cloth itself. A striated batik already has the gradient dyed into it, so a single piece of fabric does the work a painter would need a loaded brush and a very steady hand for. Choosing the fabric is the artistic act. Tucking it in is the easy part.
The whole process, sped up

Blank board to framed piece. This is Hannah's Sunrise Over the Cascades, the exact landscape you build in the workshop.

Every Kinusaiga Piece Is Unrepeatable

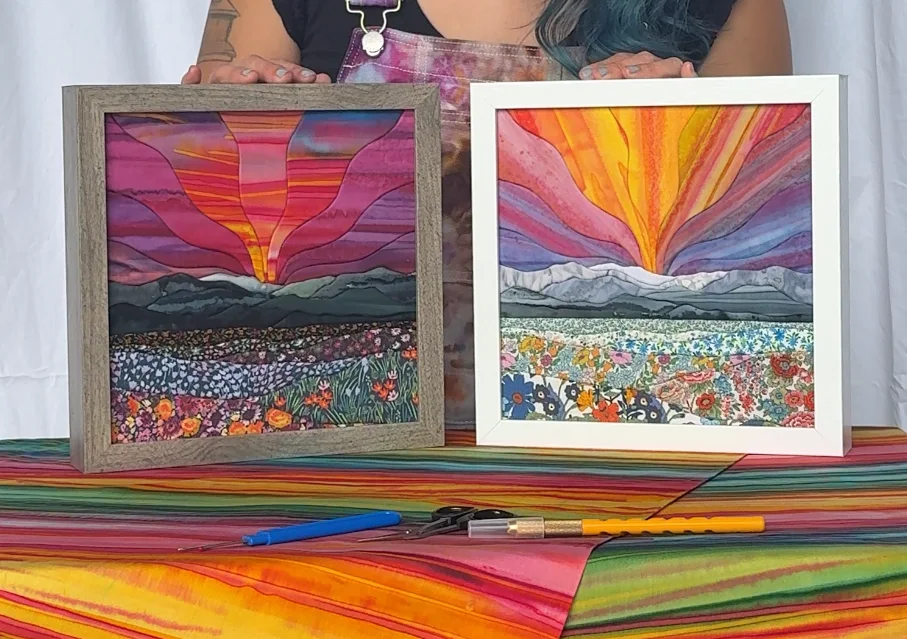
These two came off the same template. The only thing that changed was the cloth: deep berry batiks and dusky florals on the left, bright sunrise golds on the right. Fabric is the pigment in this art form, and no two people reach for the same fabric. Choose a stormy blue sky instead of a golden one and you have made a piece nobody else on earth has made.

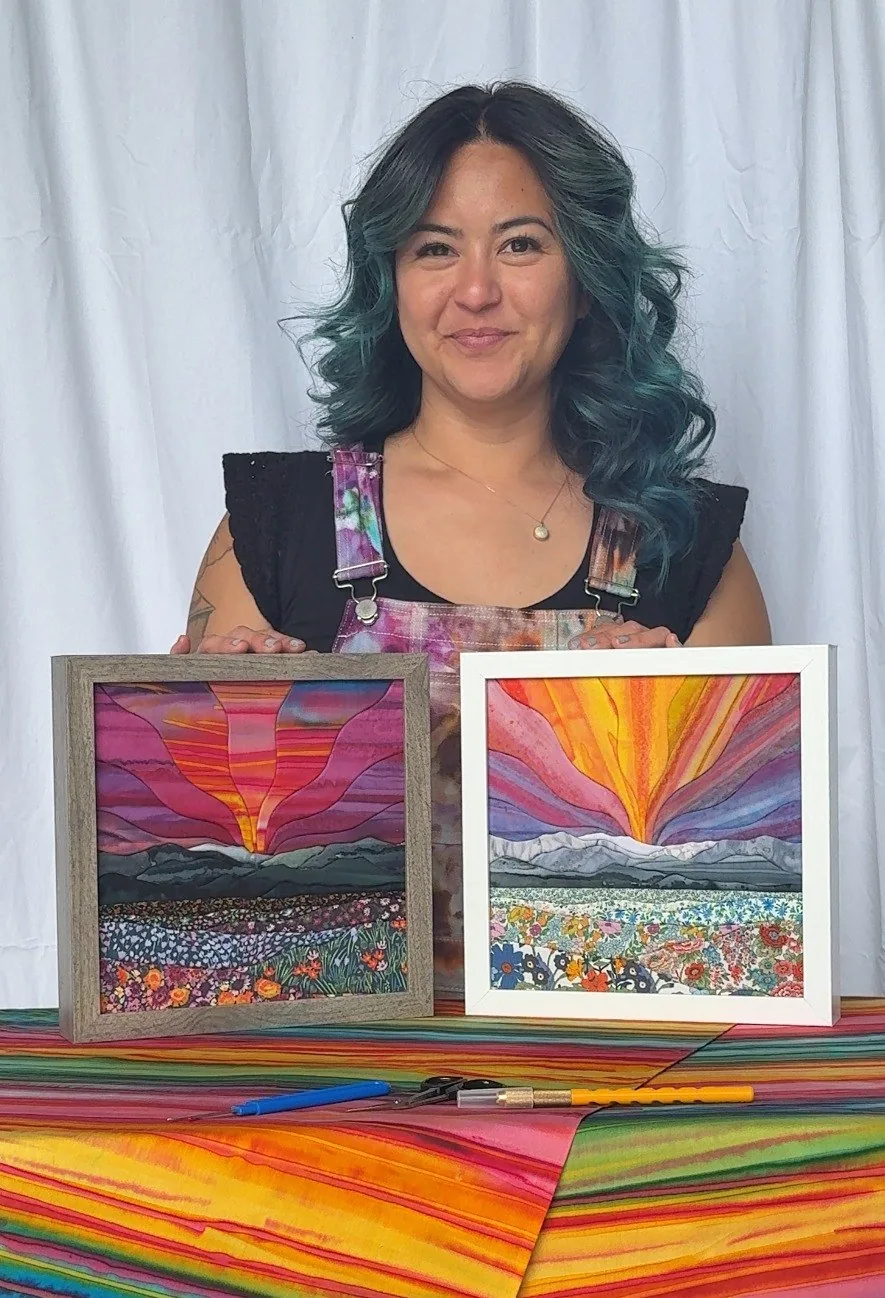
Two finished kinusaiga landscapes from the same template side by side: berry sunset batiks and golden sunrise batiks, with Hannah's tools in front

There is no color theory to get wrong here. In Hannah's words: flowers don't look around themselves to see if they match. Pick what you love and the piece works.

What You'll Be Holding at the End

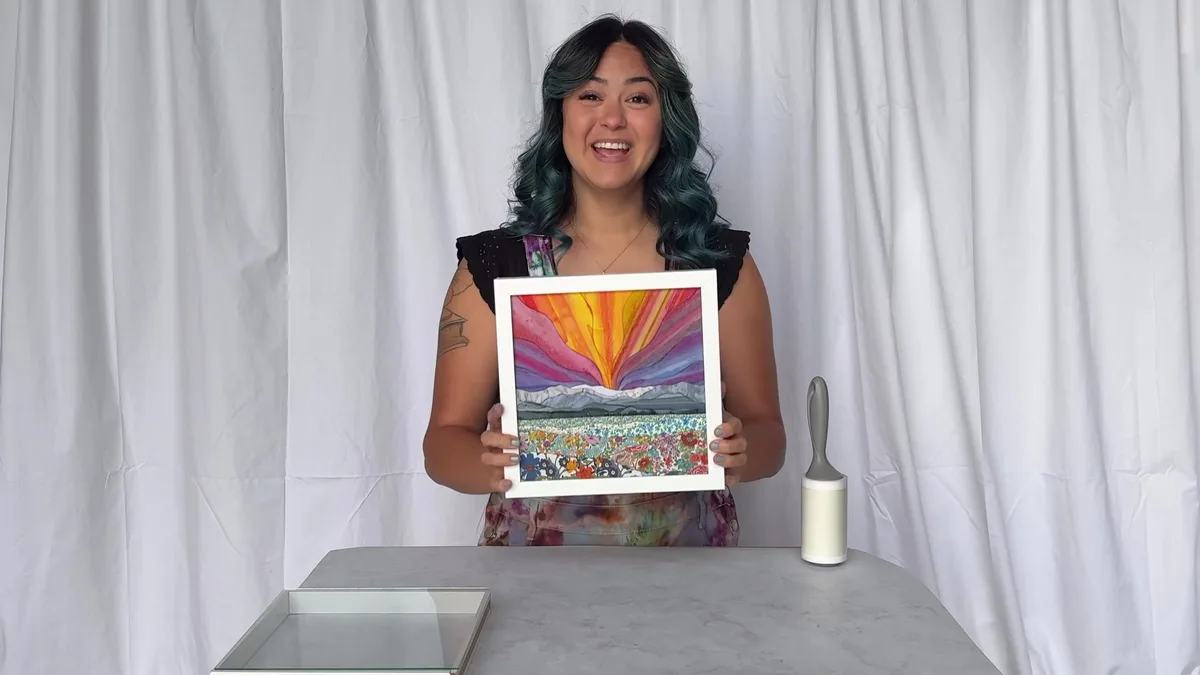
Hannah holding the finished 9 by 9 inch kinusaiga sunrise landscape in a white shadow box frame

A 9" x 9" fabric landscape, seated in a shadow box frame, ready to go on the wall.

Small enough to sit on a shelf. Substantial enough to hang somewhere people stop and look at it, then ask what it is. The included framing lesson covers the exact shadow box that fits this piece, and why Hannah takes the glass out of every frame she uses so the quilted texture stays visible instead of flattening behind a pane.

Most people don't stop at one. A second landscape in different colors for the guest room. A piece in your daughter's palette for her birthday. Something handmade for the friend who already owns everything. Once the technique is in your hands, the only thing that changes from piece to piece is which fabric you reach for.

Hannah Austin of Needle OR Thread holding two finished kinusaiga sunrise landscapes
  • Mayor's Choice and People's Choice winner, 2023 Eugene Mayor's Art Show
  • Teaches in-person classes at the University of Oregon's Craft Center
  • Her free beginner kinusaiga tutorial has been watched nearly 100,000 times
  • Her one-of-a-kind originals sell for thousands of dollars

Hannah Austin

Hi, I'm Hannah, and I'm so glad you're here! I'm the sole artist behind Needle OR Thread. I've run my own art business for seven years, and I've been practicing kinusaiga since 2022.

Kinusaiga was created by Japanese artisan Setsu Maeno, and I teach it with deep respect for where it comes from. You'll hear me credit Maeno in the very first video. The process I share is my own, built through years of exploration: my method, my tips and tricks, and a lot about my own process.

If you're worried you're not "artistic," hear me out. The fabric brings the color, the texture, and the pattern. Your job is to choose what you love and tuck it into place, and choosing what you love is a skill you already have. What surprises people most is how early the picture starts to appear. You're maybe four sections in and there it is, a sky.

Introducing: The Paint With Fabric Workshop

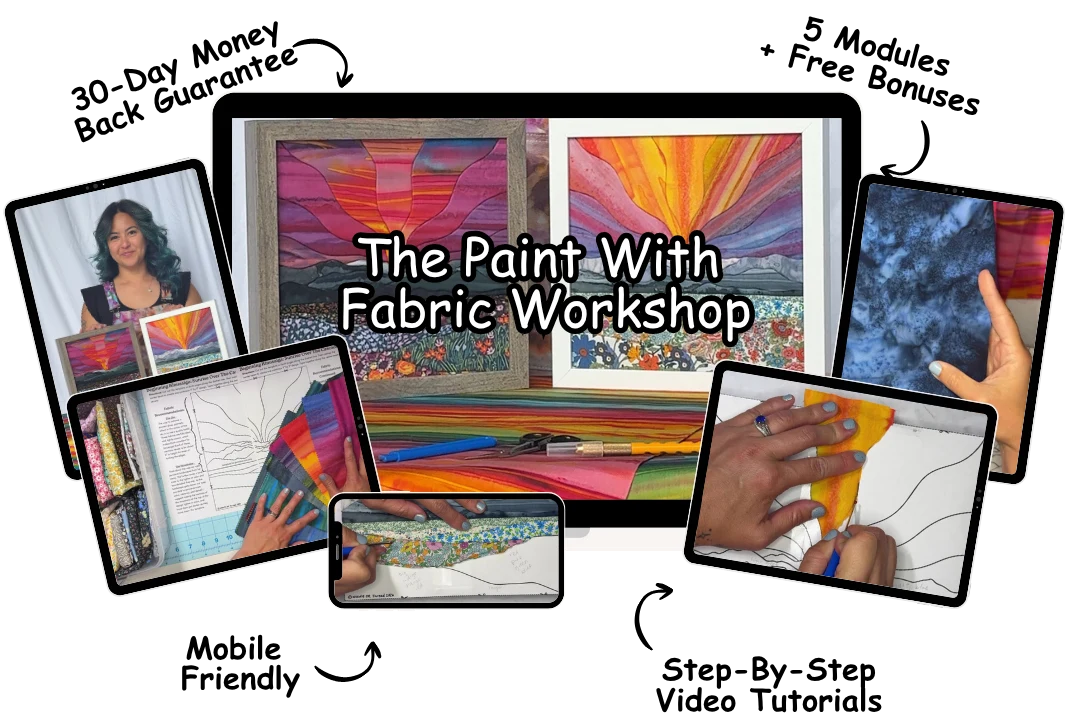
The Paint With Fabric Workshop course shown across desktop, tablet, and phone

The Paint With Fabric Workshop is a step-by-step video course that takes you from "I've never done this before" to holding your own framed 9" x 9" fabric landscape. You learn kinusaiga, the Japanese fabric art created by Setsu Maeno, using ordinary quilting cotton and a handful of inexpensive supplies from the hardware and craft store.

You follow along as Hannah builds her piece on camera, cutting, placing, and tucking every section while explaining what she's doing and why. The camera stays close the whole time, so you see exactly where the blade goes and exactly how the fabric gets pressed in. Time-lapses carry you through the repetitive stretches. By the end of the final module there is a frameable piece of art on your table and the technique is in your hands for good.

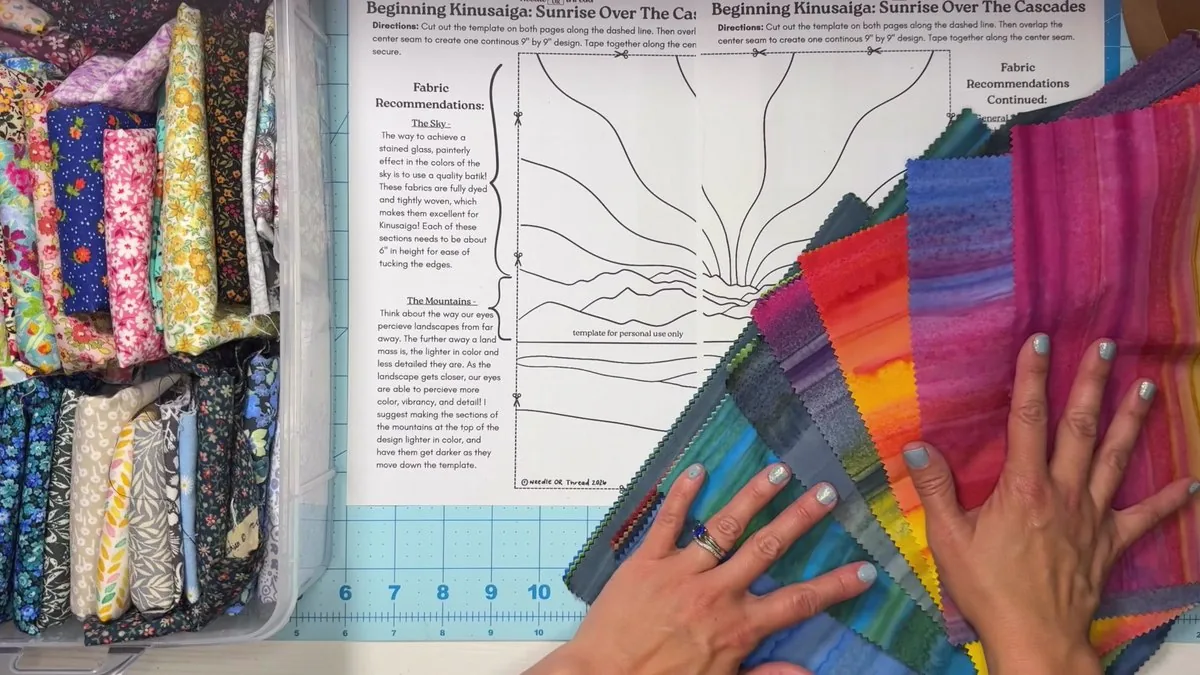
Your pattern prints from the same 9" x 9" template Hannah designed for this landscape, with her fabric recommendations written right on it. The template tells you where every line goes, so nothing is ever drawn freehand.

What You'll Learn

Five hands-on video modules, plus Hannah's welcome video and her printable 9" x 9" template. The template tells you where every line goes, so you never draw anything freehand.

Module 1: Hannah's template and fabric spread out on the cutting mat

Module 1

Materials, Board Prep, and Your Template

Everything you need and how to set it all up. By the end of this module your board is cut, prepped, and ready to carve.

  • The one-inch insulation foam board Hannah uses, where to find it at the hardware store, and the score-and-snap trick that cuts it perfectly to size
  • Her toolkit, laid out simply: a precision knife, sharp scissors, double-sided adhesive sheets, and the couple-dollar seam ripper that does all the tucking
  • Which fabrics make each section shine: batiks for the glowing sky and mountains, printed florals for the meadow, and how much of each you need
  • How to mount your printed template so every line stays put while you carve
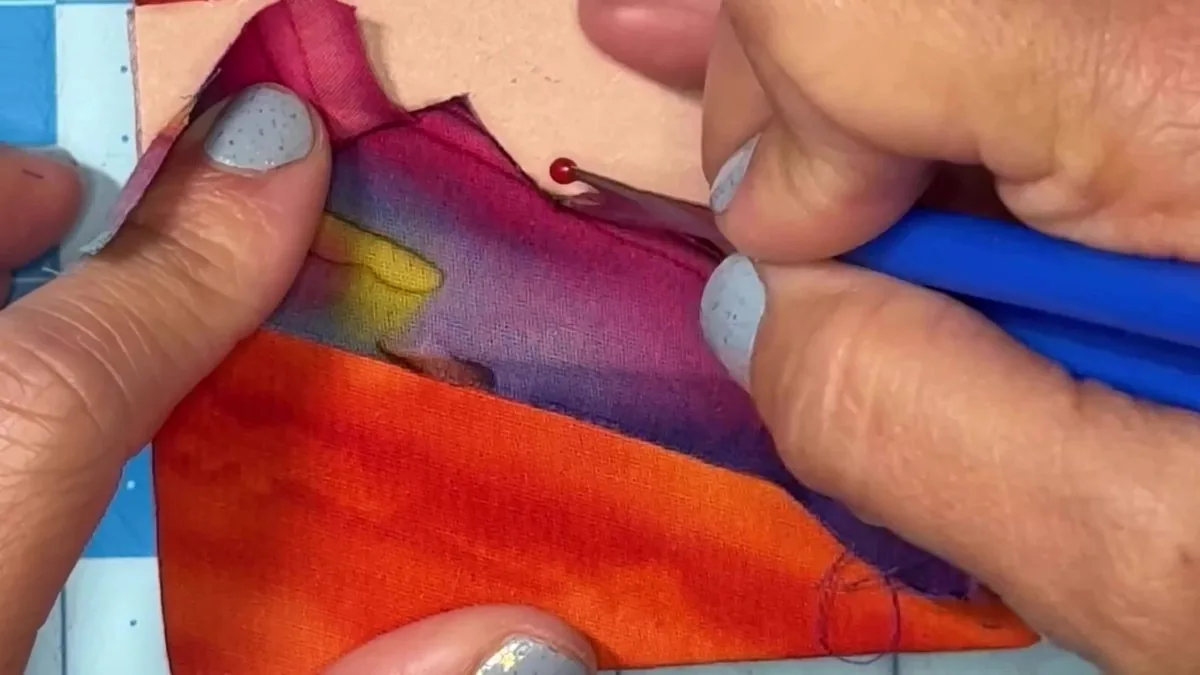
Module 2: close-up of tucking fabric into the practice board with a seam ripper

Module 2

Practice the Technique Before the Real Board

You learn every skill on a scrap board first: cutting, tucking, corners, curves, and edges. By the time you touch your real piece, your hands already know the moves.

  • The slow sawing cut that gives you clean, controlled grooves, and why dragging the blade through a dense spot of foam is how lines wander and fingers get nicked
  • Hannah's pinch-and-slide tucking method that makes every raw edge disappear into the board
  • How to handle corners, curves, and the outside edges of your board, and why the sides don't need to be perfect once it's framed
  • Simple rescues for every common mistake: bunching fabric, ripples, lifted adhesive, and fraying edges
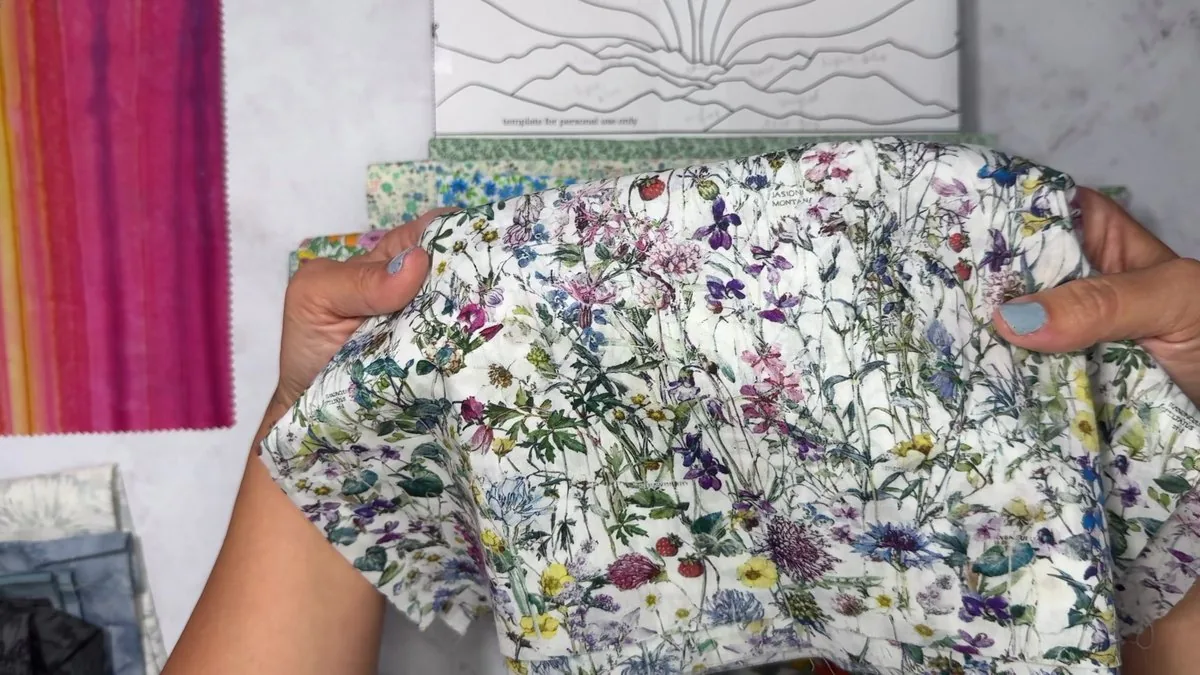
Module 3: Hannah holding floral fabric over the template while planning the meadow

Module 3

Plan Your Fabric Like an Artist

Choosing fabric is the longest, most personal part of the process, and this module is Hannah sitting with you while you do it: sky, mountains, and meadow, section by section.

  • Why batiks make the sky glow, and the difference between mottled and striated batiks so you get the effect you want
  • The light-to-dark mountain layering that creates depth, and Hannah's forced-perspective trick for making the far peaks feel distant
  • How print size fakes distance: tiny florals in back, big blooms in front, and suddenly your meadow looks a mile deep
  • Why Hannah skips color theory entirely (in her words: flowers don't look around themselves to see if they match) and what she does instead
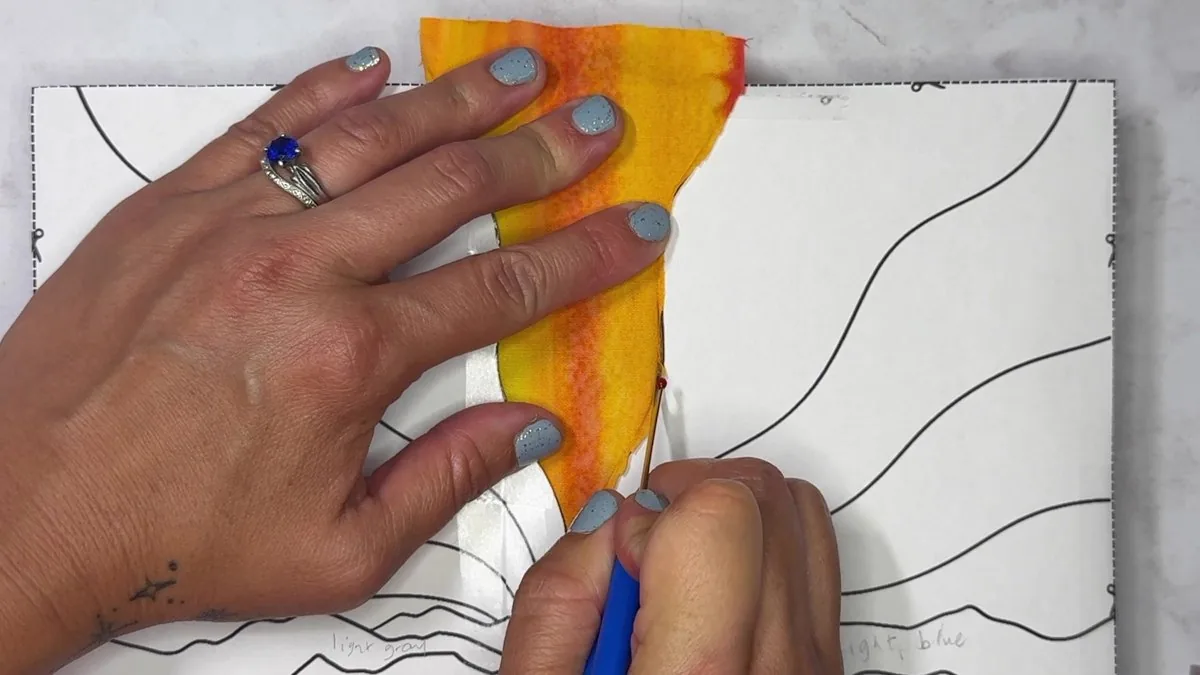
Module 4: tucking a golden batik sky ray into the carved board

Module 4

Build the Sunrise Sky

The sky is two-thirds of this piece, and it's where the striated batiks read as brushstrokes. Hannah cuts and tucks all nine sky sections on camera, from the center glow outward, and you build yours right alongside her.

  • Why Hannah starts at the center of the sky, the focal point that guides the direction and colors of every section around it
  • How to cut through the paper template cleanly so every groove lands exactly on the line
  • The gentle-pressure technique for the narrow rays near the center, where the foam is most delicate
  • How Hannah keeps her grooves nearly invisible, the detail that gives kinusaiga its quilted, painted-with-fabric texture
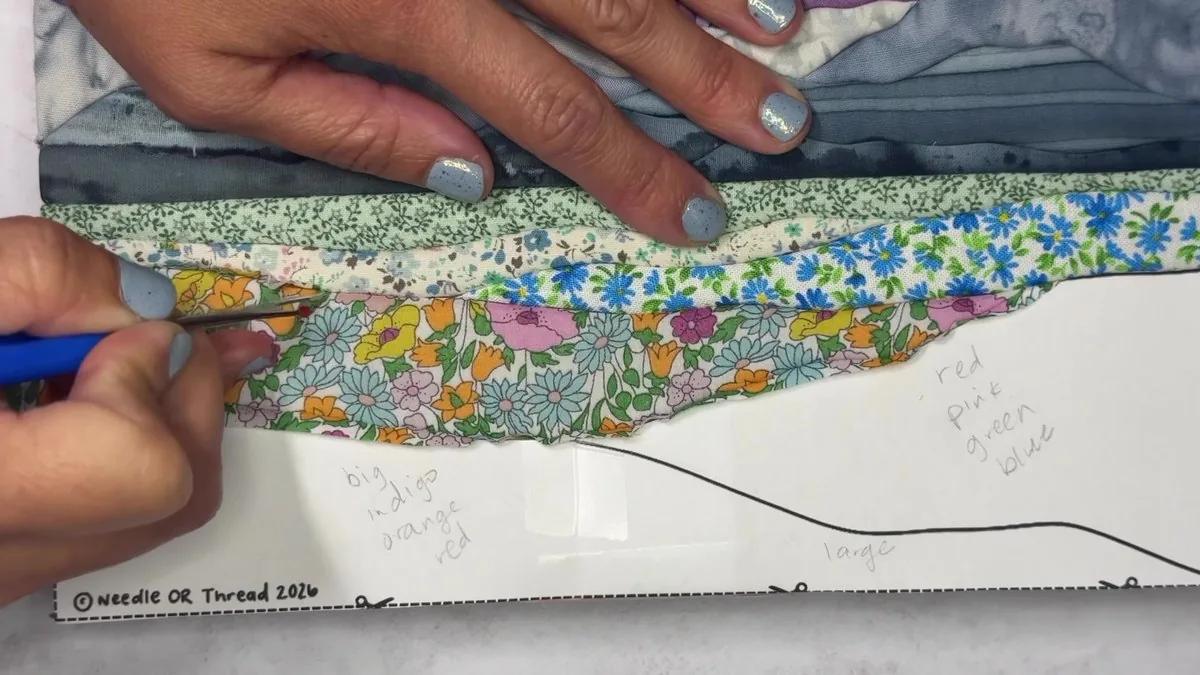
Module 5: tucking a floral meadow band beneath the mountain ridgeline

Module 5

Mountains and the Wildflower Meadow

The jagged Cascades ridgeline is the most detailed cutting in the piece. After that comes the easiest part: filling your meadow with flowers.

  • How to carve and tuck the mountain ridgeline without collapsing the narrow foam sections it shares with the sky
  • Layering gray-blue batiks from light to dark so the Cascades recede behind the glowing sunrise
  • Working with floral prints: directional patterns, looser weaves that fray more than batiks, and how to place the blooms you want front and center
  • Hannah's final once-over: re-tucking loose edges, smoothing ripples, and snipping stray threads so your piece is frame-ready

2 Free Bonuses (Included Today)

FREE BONUS Bonus 1: Hannah holding her finished kinusaiga piece in its shadow box frame

$37 Value. Yours FREE

Frame It Right

A full video lesson on framing and finishing, taught by Hannah with her finished piece, and why she reaches for a shadow box instead of a ribbon edge.

  • The shadow box that fits this piece (9 inches, with a one-inch internal depth) and how to prep it before your piece slides in
  • Why Hannah removes the glass from every frame she uses, and what that does for the texture you worked so hard to create
  • How to seat your piece snugly, secure the backing, and care for it long-term: keep it out of direct sun and lint-roll it clean
FREE BONUS Bonus 2: timelapse frame of Hannah tucking the alternate colorway's striated batik sky

$37 Value. Yours FREE

Alternate Kinusaiga Sunrise Template

Hannah builds the same template a second time, in a different color scheme, filmed as one continuous sped-up video. Watch the whole piece come together, or pause at each step and build alongside her.

  • See how much the fabric changes the mood: a new palette on the same sunrise design
  • One continuous timelapse from first cut to framed piece: carving, placing, tucking, and framing in order
  • Made for follow-along pacing: pause anywhere, work your step, then press play for the next one

For Just $47 You Get Everything

Hannah's one-of-a-kind kinusaiga originals sell for thousands of dollars. This workshop is her complete process, filmed up close and yours to keep.

The full price of The Paint With Fabric Workshop will be $97. But that's not the price you'll be paying today.

Because this workshop is brand new, there are no student photos on this page yet. Yours could be one of the first. Founding students get the workshop for $47 instead of $97, and in exchange we ask two small things: tell us what you think, and when your piece is finished, send us a photo. When the first student gallery goes up on this page, the price goes up with it.

Everything included in The Paint With Fabric Workshop shown across devices
  • The Complete Paint With Fabric Workshop $97 value
  • Hannah's Printable 9" x 9" Template, with her fabric notes Included
  • Printable Supplies Checklist Included
  • Bonus: Frame It Right $37 value, FREE
  • Bonus: Alternate Kinusaiga Sunrise Template $37 value, FREE

Total value: $171

ONE-TIME PURCHASE. LIFETIME ACCESS.

$97 $47
Start Creating Your First Fabric Landscape Now

Join as a founding student for $47 before the price rises to $97.

🔒 Secure Payment 256-bit SSL 30-Day Guarantee PayPal Visa / MasterCard

What Makers Say About Learning From Hannah

Word-for-word public comments on Hannah's free beginner kinusaiga tutorial on YouTube.

"I just finished my first piece. I wanted to thank you for creating the video... Thank you so much for taking the time to do all of this!! Your art is beautiful."

"I absolutely love it & I'm excited to try. You are an excellent teacher, easy to understand."

"My mom and I started doing Kinusaiga because of your videos and we are obsessed. We have now taught 5 or 6 other people and are having so much fun!"

"Oh God. This is very dangerous for me. I'm a quilter and this would be an AMAZING use of all the scraps that I have! Oh honey... need some foam!!! Seriously, this is amazing!"

30-DAY GUARANTEE

30-Day Money Back Guarantee

You don't have to make the final decision now. Get instant access to the full Paint With Fabric Workshop right now and try it out. Watch the videos. Follow along with Module 1. Choose your fabric and carve your first groove. If at any point within 30 days you decide it's not for you, for any reason at all, just send a quick email and you'll receive every penny back within 24 hours. No questions, no awkward conversation. You either love what you create or you get a full refund. That's it.

Frequently Asked Questions

Kinusaiga (kee-noo-SYE-gah) is a Japanese fabric art created by artist Setsu Maeno in the 1980s, built on the much older kimekomi tradition. Instead of paint, you use cloth. Shallow grooves get carved into a foam board following a printed template, a piece of fabric is laid over each section, and the raw edges are tucked down into the grooves until they disappear. The result has the depth and gradient of a painting with the soft, quilted texture of fabric. Nothing is sewn, drawn, or painted.

No. There's no needle, no thread, and no sewing machine anywhere in this. Quilting and applique join fabric with stitches. Kinusaiga holds fabric in place by tucking its edges into carved grooves, which is why the finished surface has that pillowed, seamless look. Quilters do tend to fall hard for it because it uses fabrics they already know well, but you don't need a single day of quilting experience to start.

No experience needed. This course was designed for people who don't consider themselves artists. You don't need to know how to draw, paint, or sew. If you can cut fabric with scissors and tuck it into a groove with the back of a seam ripper, you can do this. Hannah's in-person classes are built for total beginners, and this course teaches the same way: one small step at a time.

The moment your purchase goes through, everything unlocks: all five modules, the welcome video, and both bonuses. It's all pre-recorded, so you can start right now at 2 AM or next Saturday morning, whatever works for your schedule. Watch one module a day or binge the entire thing in one afternoon. There's no schedule to follow and no deadlines to meet.

A one-inch insulation foam board from the hardware store, double-sided adhesive sheets from the craft store, sharp scissors, a precision craft knife, and an ordinary seam ripper that costs a couple of dollars. Module 1 shows you the exact foam board Hannah buys. Add a 9-inch shadow box if you'd like to frame it. For fabric, quilting cottons and batiks are what you want, and Hannah walks you through exactly what to look for in each section. A 9-inch piece doesn't take much cloth, so fat quarters from any quilt shop go a long way. Starting from scratch, most people spend around $25 to $40 on supplies. And there's nothing to memorize: the full supplies list is included as a printable PDF at the very start of the course.

The course walks you through Hannah's 9" x 9" Sunrise Over the Cascades landscape, framed in a standard 9-inch shadow box with a one-inch internal depth. She shows you how to prep it, including why she removes the glass. It's real wall art, sized to hang. And the technique itself scales: once you've learned it at this size, the same method works on larger boards whenever you're ready.

No, and you probably won't want to. The template lists the fabric types Hannah used, batiks for the sky and mountains and florals for the meadow, so you know what to look for. The palette itself is yours. That's the whole nature of this art form: nobody else has your exact combination of fabric, so nobody else could make your piece.

Set aside an afternoon for the build, and don't rush the fabric choosing; that's half the fun. Hannah's advice through the whole course is that it's not a race. Some people finish in a day, plenty spread it across a weekend, and you can pause at any point and pick up where you left off.

The motions are light. The board is soft insulation foam, so carving is a slow, easy cut rather than something you force, and tucking is pressing fabric edges in with the back of a seam ripper. There's no hand-sewing and no threading needles. The finished piece is 9" x 9", a small board that sits on the table in front of you, and since everything is pre-recorded, you can stop for a break whenever you like. The camera stays close-up the whole time, so each step is easy to see.

Yes, $47 once, and that's the end of it. There's no subscription hiding behind it and no 'premium upgrade' waiting on the other side. You pay once and own access to the course and both bonuses permanently.

You're covered by the full 30-day money-back guarantee. If the workshop isn't for you, even if you just change your mind, send one email within 30 days and your refund arrives within 24 hours. Nobody will ask you to explain.

Your access never expires. Watch and re-watch every module as many times as you want, whenever you want, for as long as the internet exists. If we ever update or add new content, you get that too at no extra charge.

The entire course is video-based, and the camera stays close, so you can see every cut and tuck as Hannah does it, with the repetitive stretches sped up. You also get Hannah's printable 9" x 9" template PDF with her fabric recommendations printed right on it, plus the bonus videos. Everything works on your phone, tablet, or computer.

Free videos are a great way to discover kinusaiga, and Hannah shares some herself. But short videos are snippets by nature: a few minutes of one step, without the whole process around them. This course is the full build, start to finish. You begin with a blank board in Module 1 and end with a finished, frameable landscape, with Hannah explaining what she's doing and why at every step, plus her printable template and her fixes for when something goes sideways.

Your payment runs through a secure, SSL-encrypted checkout with PayPal, Visa, or Mastercard. Your card details are never stored on our servers. It's the same checkout security you get from any major retailer.

Ready to Make Your First Fabric Landscape?

Thank you so much for taking the time to learn this art form from someone who has been practicing it for years. Kinusaiga isn't difficult. It's patient, careful, and quietly absorbing, and at the end of it you're holding a sunrise you made out of cloth. Let's begin.

Hannah Austin, Needle OR Thread

ONE-TIME PURCHASE. LIFETIME ACCESS.

$97 $47
Start Creating Your First Fabric Landscape Now

Join as a founding student for $47 before the price rises to $97.

🔒 Secure Payment 256-bit SSL 30-Day Guarantee PayPal Visa / MasterCard